- Return to book
- Review this book
- About the author
- 简介
- 1. 安装
- 2. 开始
- 3. 系统管理
- 4. 配置
- 5. 获取
- 6. 编目
- 7. 消息
- 8. 处理
- 9. 系统
-
10.
工具
- 10.1. arclink_fetch
- 10.2. arclinktool
- 10.3. fdsnws
- 10.4. ql2sc
- 10.5. scalert
- 10.6. scart
- 10.7. scbulletin
- 10.8. scchkcfg
- 10.9. scconfig
- 10.10. scdb
- 10.11. scdispatch
- 10.12. scevtlog
- 10.13. scevtls
- 10.14. scevtstreams
- 10.15. scimex
- 10.16. scimport
- 10.17. scm
- 10.18. scvoice
- 10.19. scxmldump
- 10.20. sczip
- 10.21. sync_arc
- 11. GUI
- 12. 扩展
- 13. 过滤器语法
开始
配置和控制系统的工具为 seiscomp
初始化配置
配置 SeisComP3 运行 seiscomp setup
user@host:~$ seiscomp3/bin/seiscomp setup

====================================================================
SeisComP setup
====================================================================

This initializes the configuration of your installation.
If you already made adjustments to the configuration files
be warned that this setup will overwrite existing parameters
with default values. This is not a configurator for all
options of your setup but helps to setup initial standard values.

--------------------------------------------------------------------
Hint: Entered values starting with a dot (.) are handled
      as commands. Available commands are:

      quit: Quit setup without modification to your configuration.
      back: Go back to the previous parameter.
      help: Show help about the current parameter (if available).

      If you need to enter a value with a leading dot, escape it
      with backslash, e.g. "\.value".
--------------------------------------------------------------------

Agency ID []:
Datacenter ID []:
Organization string []:

Enable database storage [yes]:
 0) mysql
      MySQL server.
 1) postgresql
      Postgresql server. There is currently no support in setup to create the
      database for you. You have to setup the database and user accounts on
      your own. The database schema is installed under share/db/postgresql.sql.
      Note that the database encoding should be UTF8 and that you need
      to set the encoding to 'escape' for PostgreSQL >= 9,
      e.g. "ALTER DATABASE seiscomp3 SET bytea_output TO 'escape';"
Database backend [0]:
如果允许数据库存储,请选择后台数据库。 SeisComP3 支持两种主要的数据库:MYSQL 和 PostgreSQL。选择 MySQL 可帮助你创建数据库和表;选择 postgresql 需提供所需模式,可以在share/db/postgresql.sql找到。
Create database [yes]:
MYSQL root password (input not echoed) []:

Drop existing database [no]:

Database name [seiscomp3]:
Database hostname [localhost]:
Database read-write user [sysop]:
Database read-write password [sysop]:
Database public hostname [localhost]:
Database read-only user [sysop]:
Database read-only password [sysop]:
设置各种数据库选项。
如果所有问题均已回答完毕,选择可执行的命令:
Finished setup
--------------

P) Proceed to apply configuration
B) Back to last parameter
Q) Quit without changes
Command? [P]:
Running setup
-------------
* setup kernel
* setup scmaster
+ Create MYSQL database
  + Found MYSQL server version 5.5.33-MariaDB
  + Drop database seiscomp3
  + Create database seiscomp3
  + Setup user roles
  + Create tables
* setup trunk
激活模块
安装完成后并没有模块会自动启动,调用 seiscomp start 将不会发生任何事情。 要激活一套模块,seiscomp enable 需调用模块列表。 要使处理系统能够对 Seedlink 进行数据获取,使用以下命令:
user@host:~$ seiscomp3/bin/seiscomp enable seedlink \
scautopick scautoloc scamp scmag scevent
enabled seedlink
enabled scautopick
enabled scautoloc
enabled scamp
enabled scmag
enabled scevent
接下来会连续调用 seiscomp start 以使模块有效。通过 seiscomp check 将会重启所需的模块。但是在启动 seiscomp 之前,需要添加并配置所需更新的台站。
插入网络和台站
import_inv 工具用于导入编目数据。
user@host:~$ seiscomp3/bin/seiscomp exec import_inv dlsv inventory.dataless
该操作将导入无数据SEED卷并存入 etc/inventory/inventory.dataless.xml 文件。
重复该步骤导入所有编目数据。
我们导入 HK 和 IU 台网的编目数据:
user@host:~$ seiscomp3/bin/seiscomp exec import_inv dlsv HK.dataless
Generating output to /root/seiscomp3/etc/inventory/HK.dataless.xml

user@host:~$ seiscomp3/bin/seiscomp exec import_inv dlsv IU.dataless
Generating output to /root/seiscomp3/etc/inventory/IU.dataless.xml
19:11:09 [error] IU ANMO LDI sensor location '' starting 1989-08-29 00:00:00 has conflicting coordinates: 34.942500/-106.457500 vs. 34.945900/-106.457200: increasing start time by 1 sec.
********************************************************************************
* WARNING!                                                                     *
*------------------------------------------------------------------------------*
* Errors found in input dataless SEED which were fixed by the conversion. This *
* may lead to subsequent errors or undefined behaviour. Check and correct the  *
* errors in dataless SEED and do the conversion again.                         *
********************************************************************************
配置台站绑定
模块和绑定的配置请参见 [配置] 章。最方便的添加绑定的方式,执行 scconfig 命令。
user@host:~$ seiscomp3/bin/seiscomp exec scconfig
更新配置并启动
当添加或修改新的台站时需更新系统配置,执行 seiscomp update-config 命令。该命令创建模块配置文件,将绑定写入数据库并同步编目数据。
user@host:~$ seiscomp3/bin/seiscomp update-config
[output]
配置更新并且编目同步后,调用 seiscomp start 命令启动所有模块:
user@host:~$ seiscomp3/bin/seiscomp start
starting seedlink
starting scautopick
starting scautoloc
starting scamp
starting scmag
starting scevent
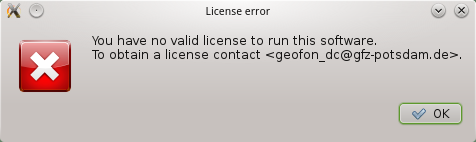
执行 seiscomp check’ 命令能够打印所有 正在运行 的模块。如果所有模块均能工作,可以调用分析工具,如 MapView:
user@host:~$ seiscomp3/bin/seiscomp exec scmv
调用 MapView 时显示许可错误: